
Kitchen Island part 4
- Michelle Dittmer
- Apr 4, 2021
- 5 min read
This post contains affiliate links. If you purchase something using a provided link we may collect a small commission, but there is no additional cost to you.
Our work on the kitchen island continues and this week we broke out the paint brushes.
Last week we finished creating the face frames for each side, but stopped short of getting them attached. This week that changed! We used bondo (a new product for us, but it came highly recommended by YouTube craftsmen) to fill the seams between the boards on the frames then sanded the fronts with the random orbit sander and used a piece of 320 sandpaper to knock down the sharp corners by hand. I did this part and Scott was so confused, he said the sandpaper was smooth enough to use as TP. (Don't worry, no sandpaper was used as toilet paper this week... we never know what the future might hold!)
Our opinion of bondo is mixed, it cured SUPER FAST (like 3 minutes), which definitely has advantages, but for us, it just created a rush when there otherwise didn't need to be one. It did sand super smooth and didn't shrink, so we didn't have to over-fill the gaps like normal filler.
Once the bondo dried, we sanded it and put a coat of paint on the frames. I didn't take any photos of this part, which Scott finds amazing because my camera is always pointing at something!
While the paint dried, we went inside and used the 3-2-1 (3 parts mineral spirits, 2 parts oil based poly, and 1 part linseed oil) to seal the insides of the cabinets.

The sealer brought out the grain in the birch plywood that we constructed the boxes from. This sealer will protect The inside and ensure if something is spilled, it won't soak in. We sealed all cabinets even though 4/6 will have drawers so you won't see them.
Once the frames dried we carried them in and clamped them on to see how they looked (amazing, duh!).


The next morning we glued and tacked them into place, filling the holes and putting another coat of paint on the frames and the outer edges.


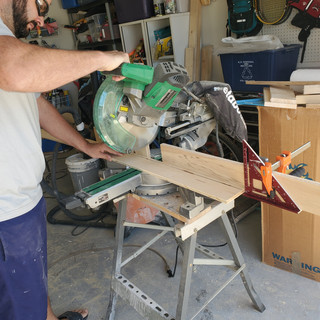
The next step was to get the drawer slides in place. We built 21 inch cabinets and therefore bought 21 inch slides. If you've ever built cabinets before you know our mistake... we actually needed 18 inch slides, the slide size is based on the drawer size, not the cabinet size, so Scott panic-ordered 13 new slides in the correct size, they'll be here this week. We can use the 21 in slides for the 24 in base cabinets elsewhere.
We didn't let this slow us down though, the back brackets are the same for either size, so we grabbed 2x4s that will act as our spacers in the back of the cabinets. We marked where the slides will go by holding the 2x4 up to the frame and marking the corners of the openings, then measuring 3/8ths of an inch over, this is where the back bracket will attach. We attached all the brackets to the boards and then screwed the boards in place.


We drilled pocket holes in the braces, but realized they would interfere with the brackets, so we just used 2in screws and screwed them into the backs of the cabinets.
These drawer slides are awesome, they literally clip into the back brackets and THAT'S IT, no awkwardly reaching inside to measure/position the slides, it's really great!
If you're looking for these slides, we found them on Amazon: https://amzn.to/2QVXqiD
They have a value pack for large projects: https://amzn.to/2PzqZpZ
With the drawer slides brackets in, we put in a couple 21in slides to take measurements for the drawers. The slides are too long, but they're the same width, so they will still give us accurate measurements.

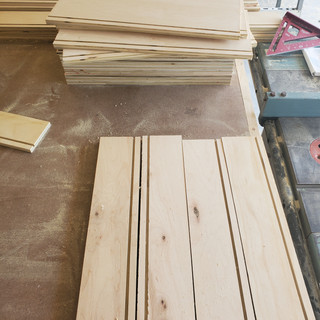
Once we had the drawer sizes it was off to home depot for wood. We used 1/2in birch plywood for the outsides of the drawer boxes and 1/4in birch ply for the bottoms.
We wrote down all of the measurements (yes, I used three notebooks so I could see everything at once, as you'll see in the video) and mapped out how to best cut our pieces with as little waste as possible. With our measurements we could get 1 drawer per "strip" of wood. We cut down two pieces of plywood into 8 8" strips and 4 4" strips.
Once the strips were cut down, we added a 1/4 inch dado 1/2 inch up from the bottom. This will be the groove the 1/4 in bottom will slide into. Instead of using a dado stack, Scott just ran each board through the table saw twice, moving the fence slightly in between passes, to make the groove.
Scott makes it look easy, but there was a long set up process to test it out and measure it correctly (so important!):
Once the dado was cut we could start cutting the pieces to size. Again, we could get 1 drawer from 1 strip. A drawer consists of 2 18" pieces regardless of drawer size because that's the depth, and 2 that were around 29 1/2 (actually 6 drawers were 29 1/2, three were 29 11/16, and three were 29 13/16, based on the measurements of the openings in the face frames). Ideally they would've all but the same, but they were REALLY CLOSE, so I'm letting it go.
With so many boards to cut at the same size, Scott created a "stop bock" by screwing scrap plywood to either side of the saw, adding a metal tape measure sticker he got on Amazon, and clamping a square at the appropriate measurement.
This allowed him to push the board up to the square and cut without measure every piece.


Note the safety glasses. Seriously, safety first! I try to stand back and document while I'm not actively helping, and the first board Scott cut with his stop block got a little wild (we didn't have the side pieces close enough to the blade so it drug the board inward towards the saw and caused it to flip up:

Don't worry, no one was harmed! Lesson learned (cool photo taken), I promise we are always careful (and you should be too!).
As Scott was cutting boards (there were no more "incidents"), I was sanding them with the random orbit sander. I started with 120 (the plywood was pretty smooth already), and ended up doing 220 on the insides (we can sand the outsides more later if we decide, but it'll be annoying, at best, to sand the insides once they're put together). At one point Scott was sanding with 120 and passing to me to sand with 220. It was a lot of sanding!


Forty-eight pieces were cut and sanded before Easter dinner at my parents' house. In between the sanding I made copycat Outback Steakhouse bread to take with us.
Dinner was prime rib and pork rib roast (Padre cooked both on the Traeger), asparagus, corn casserole, Mac 'n' cheese, and the bread we brought. It was an excellent dinner (as always!)! We finished up the day with a game of euchre where Miah and I took down the stiff competition of my Momma and my brother.
Next week we'll *spoiler alert!* keep working on the island. I can't wait to see it all together!


Comments