
Guest room flooring
- Michelle Dittmer
- Jan 18, 2021
- 6 min read
This week we focused on getting the second bedroom (our guestroom, my craft room, and affectionately deemed "the girls' room") in shape. We leveled the floor last weekend but had a slight malfunction of the drill, meaning the first bucket of self-leveling concrete was much drier than it should have been, resulting in quite a few high/low spots.
We grinded/patched and got to laying the floor.
As we've discovered in other rooms (though not to this degree) it is very apparent after laying the floor if the subfloor was less than level.
The video shows about 2 hours of work (not too bad!) that we completed rather late one evening.
The next day, it took one walk across the floor to feel where there were hills/valleys in the subfloor below.
Yikes!
Scott and I both suffer from a bit of perfectionism, so up the floor came!
We located the offending areas, used the grinder, then filled, and waited for them to dry before re-laying the floor.


all in all, it was about 2 extra days of work (mostly waiting in the concrete to cure) but they're in!
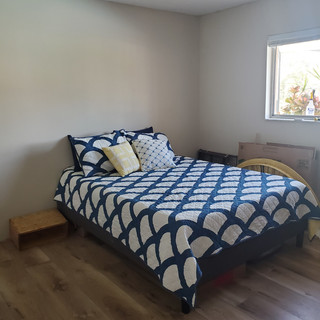
We moved the bed back into the room from the dining room where it had been while we worked on the floor, and I started unpacking and organizing my craft items.


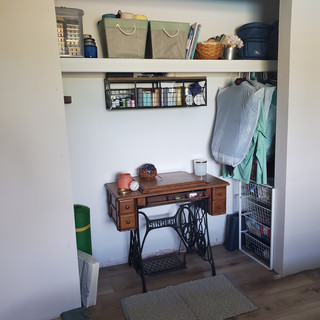
I do have the closet doors, and they will be going back on so I can hide all my craft stuff when we have guests, but for now I don't mind it!
Speaking of the dining room, I didnt get a great shot last week because of the bed, so here's the finished table/chairs in their new home!


In some free time, while I was organizing/unpacking/sleeping, Scott built a feed table (table that can be butted up to the table saw to make maneuvering larger pieces of wood much easier) that will help (and already has) with larger projects.


I know it make look like just a table, but it's AWESOME! Super sturdy, the perfect height, and he was able to use his Jointer, Dado (multiple blades used at the same time on a table saw to cut out a groove that the top of the table sits in), and some of his Kreg tools he got for Christmas (thanks Momma and Padre!).
We had originally talked about tackling the other guest room(affectionately deemed "the boys' room) next, but honestly the idea of unpacking/moving everything in there caused me a lot of anxiety.
We've been using this room as our "catch-all" for anything we don't have a place for yet, which includes (but is not limited to) a ton of boxes if kitchen items that I dont have room for/don't want to unpack just to move them again in a couple months when we start the kitchen, Christmas decorations, wall decor, lamps, beach stuff, etc. It's seriously a mess, you can hardly walk in there and GOOD LUCK finding anything you need. *sigh*
In addition to being the catch-all, it has had zero work done; so it still has a popcorn ceiling, no overhead light, no shelving in the closet, no floor, and is in desperate need of paint. It'll be a big, messy project when we are ready for it.
I did my best to pull some things that will remain packed into the girls' room just so they are out of the way, but it hardly made a dent in the boys' room, so we (I, mostly) have decided to focus on finishing something before we move to that room.
Enter our new door! Yes, I know last week we showed a new door, but that was an exterior door, this is an interior door (completely different, obviously) ha!
The doors on this house are builder-grade hollow core doors. I have nothing against builder-grade, but I LOATHE hollow core doors. They are light-weight, you can't slam them (not that I would, but I'd like the option!), and worst of all, they offer no noise insulation.
Our living room is right outside of the master bedroom, so if I want to go to bed and Scott wants to watch TV I can hear it as though I am in the room with it. This will be a non-issue when the boys' room is ready, but right now it's a problem.
In addition to the noise being a nuisance, we can't lay the threshold between the living room and bedroom until the new door is in place so we can be sure to fit the threshold around the doorframe.
So, with the noise issue, and the threshold needing to be in place, I deemed this our next project.
The doors I ordered said they were "pre-hung" (meaning the door and doorframe are one piece), but that they were also "reversible" (remember our convo about handing last week), I really wasn't sure what I was getting.
The doors came unattached from their frames, but they weren't too difficult to assemble. We did have to use the Dremel as the door knobs I bought had larger strikeplates than the door notches allowed.
With the door put together, and the doorknow in place, we carried it inside to put it in.


Scott might be (slightly) over my photo-taking. I keep teasing him saying "if we don't blog about it, did it REALLY happen??", he's not amused.
He took the old door out, then took some time to take up the last row of flooring to slide the threshold into place. That required cutting one board a little bit, but it wasn't too tricky (says the girl who just stood and watched).


With the threshold bottom in place (it's two-parts, the top snaps into the bottom), we put the doorframe in place. It was a tad tricky to get it even (also, perfectionism...), but Scott got it in place with very little trouble.


The new door is just primed white, (I'm toying with the idea of doing colored doors, but honestly can't think far enough ahead to choose a color that will look great with every room), but will do for now.

I'm OBSESSED with the new doorknobs we chose. Years ago, I saw a glass doorknob similar to these at Anthropologie and fell in love with them. I always said I'd put a glass doorknob on my bathroom, it just felt elegant. When I pitched the idea to Scott I don't think he was super keen, but he's great at letting me choose things that make me happy, especially if it's something he has no major opinion on. I ordered these for the whole house (five doors. We have a 3/2 house and literally only 5 doors, counting the door out to the laundry room, haha), they came a couple weeks ago and I've been staring at them longingly ever since.


There's heft to the new door (I've resisted the urge to slam it), it does block a lot more noise, and it just plain looks nice.
We still need to do the trim around it (and everywhere else), but I love it already!
Thanks to MLK Day, we both had today off, so we got an extra day to work.
I skim coated the hallway (like I did in the dining room due to the uneven/bumpy walls), primed, and chose two sample colors to test out.


If you remember from a couple weeks ago we had to take down the ceiling in the hallway due to previous water damage, it was bowed pretty badly, and had the popcorn ceiling, so we took the easy way out and tore it down.
I came across an image online of a cedar ceiling and a black accent wall in a hall and I'm going to try to create it with our hallway. I would show the image, but can't find the source, I'll update if I do find it, but stay tuned, ours will be done soon 😉
I want to see the two colors in the light tomorrow and hopefully we'll get it painted next week.
While I was working on the hallway Scott went fishing (fishing, not catching) and hung a couple new lights in the garage when he got home.
We came across these LED replacements for the fluorescent lights in the garage for $40 at Costco. We weren't looking for new lights, but we both hate the fluorescent ones (we have them in the garage, kitchen, and bathrooms and I think over half the bulbs are out or on their way out, they flicker, and do not give off a flattering light), so we grabbed two for the garage.
Scott put two up (they're really bright!) and replaced the switch in the garage. We actually have 2 flourescent lights, two places for bulbs, and a ceiling box that's been covered over, plenty of potential for lighting!


Writing this all out makes me realize what a busy, productive week we had, even with the setback of the floor. I'm really looking forward to getting the hall painted next week and maybe building something *nudge, nudge Scott!* 😁


You are making so much progress. So enjoy your sharing. 💘