
Tearing down and building up
- Michelle Dittmer
- Dec 6, 2020
- 5 min read
We are officially under 3 weeks until we can install floors, which means under three weeks til Christmas as well! I don't know where this last week went, but it absolutely flew by.
With the sun setting so early it feels like we're getting less and less done in the evenings but luckily we're still making great progress on the remaining pre-floor work.
This week we (Scott) decided to tackle a project that will help us get ready not only for floors but for our new kitchen as well. We are a long way away from doing the kitchen, but since we took down the upper cabinets that were over the peninsula and got rid of the square island, we had eliminated a decent amount of cabinet space and we knew just how to fix it.
Our refrigerator is on a wall that has an "alcove" on the opposite side. The alcove had photos and an overhead light in it when the previous owner owned the house, but wasn't really useful. It was a large enough space for a closet, but had no door, so I wouldn't feel comfortable hanging too much stuff in there. We had some options: 1) leave it as-is and hang our own photos in it, 2) add a door to make it a usable closet, or 3) reduce the size of the alcove to "push" the wall back on the fridge side to allow for more cabinets. This particular part of the wall was one foot further into the kitchen and the rest of the wall, making it too far into the kitchen to put cabinets on, but if we moved it back 12 inches we could add almost 4 feet of cabinets/counterspace.
First, Scott had to take out the section of the wall and ceiling we needed to remove.


We actually liked it open, but that additional countertop space will be so important for storage!
We have two layers of blown-in insulation that came down like snow throughout the whole demo process.

This picture is inside the alcove, looking up. The insulation you can see is above the bulkhead in the kitchen. Where the ceiling is with the light is where the "normal" ceing is. We'll be removing the bulkhead when we re-do the kitchen, which will raise the ceiling up one foot to just over 8 feet (it's pretty low right now) at the "normal" height.
Once the wall was out, Scott framed a new wall to slide into place.


Then it was time to put up drywall.


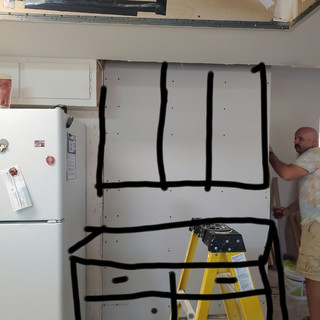
I know what you're thinking "how is Michelle so artistic??" (Ha!), I'm no artist, just taking advantage of the little drawing feature on my phone to help with the *visualization* of things to come!
This wall contained the cable outlet for our internet, as well as several switches and outlets that all needed new homes in the walls. Scott was even able to add an extra outlet on the new wall; since there will be countertops here I'm sure it will get used!


My dad had the idea to move the internet stuff (technical term) into the alcove, up near the ceiling (out of sight and no longer on the floor in the walkway!), so Scott added an outlet up high and moved the cable cord. He also replaced the light while he was at it.


You can't see any cables unless you step into the alcove and look up, so they truly are out of sight.
We still need to patch and paint the drywall, but we can say we tore down, and then built, our first wall!
While Scott was hard at work on the wall, I finished my $10 side table for the living room.
I got this fun little table from Facebook marketplace without a real plan for what it might look like when I repainted it. Last week I stripped the top and sanded the sides. There were some details that I was honestly too lazy to worry with sanding, so I repainted them white.


I actually liked the look of the sides, they have a light wood veneer on them that I could have painted, or stained, but I chose to just give them a clear coat.
The top needed something fun so I ran to joann's and grabbed a flower stencil. I used the stencil to cover the whole top, then once the paint dried, I went over it with 220 sandpaper to lighten up the paint and give the pattern a "worn in" feel. I did the same thing to the insides of the doors, and spray painted the hardware gold. Finally, I added a couple of layers of clear coat to protect it, and reassembled the doors.


It's a pretty large side table so it will be great for holding my knitting projects when I'm not actively working on them.
Speaking of knitting projects, I finished a hat for a Christmas gift this week. I just need to weave in my ends and it will be ready to ship out!

Scott has requested a hat for boating since "it's winter now", so you can see his blue yarn in the top of the photo.
My parents came to visit on Saturday with the kids so we drug out the cornhole boards to entertain the kids while we worked. Scott focused on the wall and added another coat of paint to the living room ceiling (yes, we did more patching, hence more painting), mom and I touched up the dining room (re-spackled, sanded, and repainted a wall, and touched up around the ceiling), while Dad replaced all of our outlets/switches in the dining room.
Saturday night we headed to Fort Myers Beach for a boat parade. We stayed far away from crowds, finding a place along the seawall to sit, and enjoyed the light show. It was short, but a lot of fun!


Remember that peninsula i mentioned taking out of the kitchen? Well it's been libingbin our garage (along with our floors and a ton of other stuff. We knew we wanted to hang it on a wall and finally did this week!


We chose to hang it high because this is where Scott's saw usually sits, so we didn't want to impede the use of the saw. Unfortunately, that means I need a step stool to reach the cabinets, so I guess Scott will have them to himself! Ha!
The last project for the week is not quite done. I've been looking for a bold color to paint the inside of our front door. We were at Home Depot for the hundredth time and I came across Canyon Blue and thought it would be perfect.


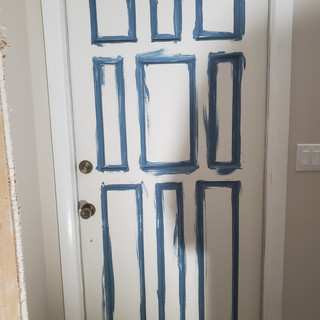


The whole door needs one more coat and I need to open it to paint the edges but didn't want to after dark for fear of inviting swarms of mosquitos in to view the work light.
We are in the final countdown for floor installation so the next couple of weeks will be focused on pre-floor work that MUST be done. Cutting a trench to run electrical to the island and leveling the subfloor are the two main priorities for work, but I would also like to get some lights up in the main areas of the house to make evening work easier.
It's all coming together and I'm so thrilled with the work we've done so far!


Comments