
95% Completion of the Island
- Michelle Dittmer
- May 2, 2021
- 4 min read
Ok, I didn't really add up all the steps and calculate what percentage we are done, but I am estimating that we are SO close. Anyone walking into our kitchen today would see a fully-functional, and stocked, kitchen island! The remaining items are really just floor to cabinet trim, adding the shelf in the cabinet, and painting the toekicks.
The last few weeks our week-night work has been minimal, but that changed this week. It felt like a big ol' checkmark for the to-do list was within reach and we worked so hard to get us there.
This week we finished painting the doors (three coats total, sanding between each coat) and put them up. Thanks to the pre-drilled holes from last week they went up really quickly.


We finished building the box for the trash cans, and put the drawer front on, making it our first cabinet with a handle!

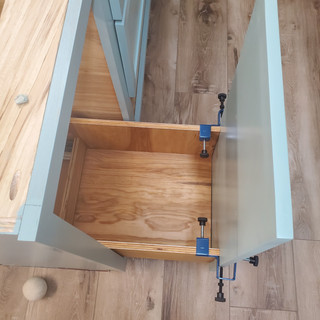


The handles required two separate trips to the hardware store for screws, the first because the screws were too long for the trash cabinet and the second because they were too short for the other drawers. Who decides the screw lengths anyway?


With all of the handles on, the only remaining cabinet was the kitchenaid/instantpot cabinet. This was the only "true" cabinet on the island as even the trash "cabinet" is technically a drawer.
For Christmas, Scott got a concealed hinge jig from my parents, so he was able to put it to good use (after I had turned in, so I don't have photos of this part). The hinge is soft close (like the drawers), so no slamming cabinets for us!


With the doors and handles on, it was time to work on the top. We purchased two 98"x25" pieces of butcher block from Home Depot. We had originally planned to do a 12" overhang for stools at the end, but after seeing how much room that took up (and with the close proximity to the dining room table), we decided against it.


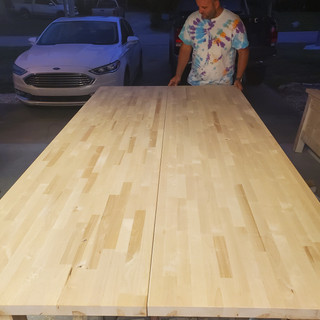


We started by cutting 3.5 inches off of one edge of each piece. Once the cuts were made, we positioned the two pieces with the cut edges together. We coated the edges in glue then screwed two pocketholes on each end just to really pull the two pieces together, then we clamped them together and filled the crack with glue and sawdust to blend it in.


With the two pieces held securely together, we cut about 5.5" off each short end to get the length correct. We then let it dry overnight.
The next day we sanded the whole thing with 80 grit, focusing a lot on the seam, and re-filling as needed. We then moved on to 120 and 220 grit. Once it was smooth, we sealed all sides, including the bottom with butcher block conditioner. It was easy to apply, a little greasy, but it really brought out the variation in the wood.


Can you spot the seam? It's not invisible, but I also don't think it's glaring unless you look for it.
After two coats of sealer, we carried it inside. I'm crediting the mimosa I had prior to moving it with giving me unusual strength (each panel prior to cutting was 86lbs, so I have to think this monster was still over 150lbs and AWKWARD).
Are you ready to see the island in all of its 95% glory??


Ta-da!
With the top on, it was time to fill all of the drawers!
We've had a good chunk of our kitchen stuff in boxes in the guest room, and some things (like the wine glasses, sorry Patty!) are still there just so we don't have to re-pack them when we replace the upper cabinets. But, I am in AWE at how much stuff fit in those 12 drawers.


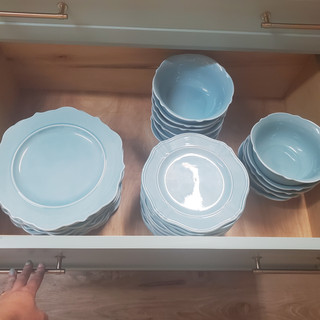


The spice drawer! The unitasker drawer! The baking sheets! 😍😍
Yep, even my plates and bowls are in a drawer. I wasn't sure how I'd feel about it, but then I unloaded the dishwasher and I'm CONVINCED this is where they belong.

It was SO EASY to pull the dishes straight from the dishwasher and put them in the drawer.
We were at a great stopping point on the island, so Saturday we focused on another project. We purchased and assembled a storage shed for our bikes and beach gear to hopefully keep it less dusty and more "ready-to-use" than it has been, while also opening up some extra room in the garage for future projects.


The instructions said it would take an hour and a half to assemble, clearly that's if you're experienced in the realm of shed assembly, but we are not. It's together now though and the bikes are in their new home.
Completing the island top was such a big step that we did take a while to relax this weekend, kayaking in the canal, swimming, and on Sunday I went with my parents and the kiddos on an airboat ride in the Everglades.


Sunday night we put a new kitty door in the bathroom door. Clover prefers to be outside at night, but her food and litter are inside, requiring a few in-and-out trips per night, so we are hoping she'll let herself in through the door.


The first "use" (me pushing her through the flap) was a giant fail, with her frantically running through the bathroom, getting caught on the extension cord Scott had out to cut the hole in the door. I do not have high hopes of her wanting to use the door quite yet, but we'll see. Hopefully, eventually, she comes to realize the level of freedom this gives her and she doest abuse that freedom by bringing in too many lizards (also don't have high hopes for this).


Comments