
Kitchen Cabinets part 8
- Michelle Dittmer
- Nov 9, 2021
- 4 min read
Last week we put two coats of paint on the front of the doors for our lower kitchen cabinets, so this week we focused on the back.
We painted, sanded, filled and repainted a couple of times trying to get them to look just right. The backs won't show too much, but you can see them around the edges of the drawer boxes when you open a drawer.

I know what you're thinking: "but who will look there?". Well, ideally no one. But, this is our kitchen, and more importantly it's our home, and we want to take pride in it. So, sand, fill, and paint we did! I think we are one coat away from finishing them.


It's a good thing we're so close because there's a paint shortage that has prevented us from being able to find the second gallon we will undoubtedly need! We are using a semi-gloss enamel from Sherwin Williams that is either super popular or contains some specific ingredient that is apparently really rare (maybe both?). So we've been extremely careful with the little paint we have left, not wasting a drop!
While we waited for filler/paint to dry we took advantage of the cooler weather that has finally hit Florida to work on our front door some more.
This poor door has seen better days. It was white when we moved in:

Then I painted it blue:


But the blue started quickly peeling/scraping off (that's what happens when you put water-based paint on top of oil-based paint), so I started sanding and found the beautiful wood under the layers of paint and stain:

Sanding was REALLY hard work, especially verticle, so it stayed partially sanded for a *really* long time and I avoided showing it in any photos:

Finally we took the door off a few weeks ago and my mom helped me sand and strip the door. We made good progress, but still had a ton of work to do:


This weekend we made some serious strides in the stripping/sanding when we purchased a belt sander and went to town getting the paint/stain off:


That belt sander was probably the best $65 we've spent in a while! We sanded all the flat parts and used stripper in the grooves and scraped as much paint out as we could, leaving just small amounts to be sanded in the future:

We'll sand the door down to 220 grit and seal with a clear sealer (at least that's my goal!) then we'll work on the outside. The outside has a cool boat carved into it, so it'll stay painted, we just aren't sure if we'll sand/strip first or try to do primer and paint.
If you're wondering why we are going through the trouble of sanding and stripping and not just replacing the door, it all comes down to cost and availability of doors. Months ago I looked at doors, wanting to find something that would let some light in, but the shipping delays meant we'd be waiting 4-6 months and the cost was pretty high for something that didn't *have* to be replaced, so I resigned myself to fix what we have, for now at least. The positive thing is I really love the look of the wood with the tile in the entry, it adds so much warmth to that area. Who knows, maybe when it's all done I won't want to replace it anyway.
Scott also used the cooler weather as an opportunity to brew some beer, something he hasn't done in a while.
He has a pretty good setup as far as brewing equipment goes, but he only has one keg to boil in that has a spout to get the beer out and he really needed two.
There are all sorts of technical terms for Scott's brewing setup and process, but I'll be honest and say when he started explaining it I couldn't take notes fast enough and it was basically gibberish, so I'll use layman's terms.
To get the second keg ready for boiling he had to cut a whole in it the size of the spout:

He used a "step bit" to drill the hole:

It was super loud drilling through the metal, echoing in the keg, and the keg, bit and tiny shards flying off were HOT. I do not know this from any sort of experience (thank goodness!) but took Scott's word for it.
Once the hole was drilled he attached the spout and checked that it held water:

All good and ready for beer!
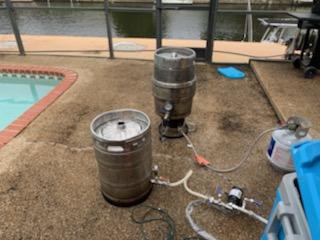


He boiled, strained, cooled, added hops and finally "racked it to the primary carboy" (which just means he tried to leave the solids behind and get the liquid into the glass fermentation container) in the boys' room closet to ferment. We are just a couple weeks from beer!

The hose and bucket is an air lock. The white bucket has water in it and the hose is in the water so the gas created during fermentation keeps negative pressure in the hose so the gas can get out but no air can get in.
This is supposed to be a light, easy drinking beer that even I will like, so I'm really excited!
We spent Sunday evening at my parents' house for hibachi dinner cooked by Padre on the flattop grill. The time change left us tuckered out so we called it an early night and watched the season premier of Yellowstone (Scott and my dad are OBSESSED!).
Next week the goal is to finish the drawer faces for the bottom cabinets that we've already built and build the corner cabinet face as our hinges should hopefully be in.


Comments